Blog

Lighting Up Those Summer Nights

It has been a chilly spring around here… some days it feels like we skipped right past summer and looped around to fall again! But as June approaches, anticipation builds and I dream of warm nights, of sipping wine on the patio, and listening to the sounds of summer. After another cold spring day (it’s May, Mother Nature, MAY!) I decided to get my craft on and make a little something summer-y, a little something to light up those warm summer nights… if they ever get here.

The project was easy-peasy: less than $10 for supplies and definitely less than 10 minutes to assemble.

What you need (makes 2 lights):

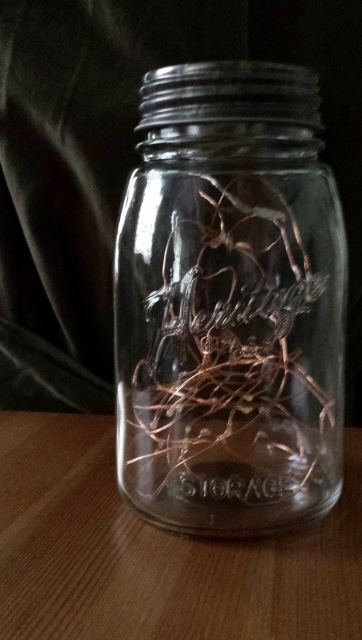
Battery powered copper string lights – the copper makes the light cord flexible, so you can shape the light inside the glass, creating the “floaty” effect). I purchased a set of 2 for $8 on Amazon.

Mason Jars w/lid – you need the lid to secure the battery-case of the light string, and it will keep the inside of the jar and lights from getting grungy. You can pretty much pick these up anywhere, from the grocery store, to Wal-Mart, to Michael’s (that’s where I bought mine, half off plus another 20% off, plus I liked the vintage-feel to the lid).

Tape – plain old Scotch tape will do, or you can get fancy with some washi tape. I had some pretty patterned masking tape on hand, so that’s what I used.

So now comes the really hard part – you ready?

1 – Coil the copper string so it is a series of loose loops

2 – Cram the lights into the mason jar

Mason Jar lights off (362x640)

3 – attach the battery case to the underside of the lid (secure with tape)

4 – turn on the lights

5 – screw on the lid

Mason Jar light night (658x1024)

Ta-daa! Now let’s have a cocktail. (If you know me, you know where I stole that from).

Vintage Fruity Monsters to the Rescue!

Vintage Fruity Monsters? Now, that ‘s a movie I want to see! If you are like me, your mind may have concocted an image of Bella Lugosi, Lon Chaney, and Boris Karloff starring in some bizarre Rocky Horror meets Avengers mash-up.

But no, I’m not talking about those kind vintage fruity monsters. (and if you’re not like me, than I apologize for putting that image in your brain). To make up for it, check out this Tumblr page full of cool vintage monster images.

I’m talking about these guys.

So how, you may be wondering, are a hot pink Frankenstein, chocolate-sucking vampire, and boo-tylicious ghost going to come to your rescue? Well, let’s say it’s less than a week before Halloween, and let’s say you somehow ended up getting nominated to bring treats to a school/office/whatever function. You’ve already blown a month’s salary on candy and costumes, you need something cheap and fast. Enter, the monsters.

Like the Halloween Mood Table, I blame my husband and his love for the website Dinosaur Dracula for the birth of the Monster Krispy. Throughout the month of October I’ve been experimenting in my lab kitchen, creating a new breed of marshmallow+sugary cereal treat.

Count Chocula’s turn came first…

Count Chocula treats

Then Frankie had a turn in the lab…

Frankenberry treats

Boo Berry, get ready, your turn is coming…

To make your own monster treats, simply gather the following ingredients:

2 10 oz bags mini-marshmallows (8 cups, give or take)

1 “family size” box  of Monster cereal (10 cups) , any variety (aside from the Unholy Trinity, Fruit Brute and Yummy Mummy are also haunting supermarket aisles right now)

1 stick (8 tablespoons) butter

Like a traditional cereal bar recipe, grab your cauldron pot, melt the butter, then add the marshmallows and stir until it looks like The Stay Puft-Man after the Ghostbusters blasted him.  Turn off the heat, mix in the cereal until it’s all a sticky glorious glob, drop it into a pan (I prefer a jelly roll pan lined with parchment paper) spread the glob out evenly using wax paper, parchment, or your hands (please wash them first). Let it set, then cut into bars. The more marshmallows you use, the softer (and stickier) your treats will be.

And you’re done! Time to party. Need some Monster Music to munch to? I’m a sucker for the traditional favorites like Monster Mash and Thriller, and check out this tune, a current favorite of the 2 mini-redheads in my house.

Need Help Setting the Mood?

With temperatures dropping into the 30’s and snow predicted for tonight, I can almost understand stores who deck their halls and aisles with Hallowmas – aka that bizarre trend where Halloween rubs elbows with Christmas…

Wait, no I can’t.  October is for Halloween. All Hallow’s Eve is less than 10 days away now, and if you haven’t gotten into the spooky spirit of the season, I may have something to help.

You see, at the start of October, I had no desire to to bust out the orange storage boxes and decorate our house with witches, ghosts and all things pumpkin. I just wasn’t in the mood. The husband has always been fond of my usual fondness for holiday decorating, and he kept nudging me about it – finally going so far as to request we create a Halloween Mood Table; an idea he got from Dinosaur Dracula, a website he’s followed for years.

“You want a what?” I asked.  And he directed me to DD’s blog post about this design phenomena.

Basically,  the concept is to make it look like Halloween puked all over the table of your choice. Now, my preference for Halloween decorating is to stay away from the gory gross stuff. I strive for more of a cute creepy vs. psychotic. This is what we ended up with:

Halloween Mood Table

At first I grumbled about it, but as we kept adding things to the table, like Halloween books and seasonal movies (and video games courtesy of the husband); I found that the table was doing its job – I was getting into the Halloween spirit!

Halloweeen Mood Table Dark

We’ve continued to add some more stuff here and there (mostly crafts by Miss A and Lil’ G), and I have to say, it has been nice to have this big ol’ pile of Halloween greet me at the door. I’ve definitely gotten in the mood.

If you created a Halloween Mood Table, what would be on it?

Halloween Crafts That Aren’t Too Tricky

Today is 10/10, make a wish!

Did you wish for fun ideas to add plenty of thrills to your child’s Halloween party? You did!? Well you’re in for a treat because October is the month I put my witch hat on and get all crafty. (I try not to ride the broom and cackle too much, it bothers the neighbors).

I admit I’m one of THOSE moms. You know, the kind of mom who just loves planning class parties and gets goosebumps of anticipation while browsing Pinterest boards for spooky crafts, games and treats. At the same time, however, I’m also the kind of mom who likes to KISS (keep it simple, silly!). Kids don’t need too much to have fun. And fun is the name of the game.

One of my easiest Halloween treats is a healthy version of the Owl Smore, a fall dessert created by Amy Locurto. I first blogged about adapting her recipe HERE. My version is super simple: graham crackers, sliced bananas, raisins or craisins, and candy corn (or even better – almonds if nut allergies aren’t an issue). Put out the ingredients in bowls, and let kids assemble their own owls!

healthy-owl-smore-300x209

To make them look even more “owl-like” you can add a circle of fruit on top of the bananas before the raisin. Circles of mango or pineapple work best…but it does add to the mess!

Because my girls go to a charter school with a strong focus on healthy eating and green living, I find many of the traditional party games and foods just don’t fly. Hence, I end up tweaking things – like the owl treat above. Another tweak came about when I was trying to plan crafts and games. One of my favorite Halloween party games is the “Mummy Race” – where teams of kids are given a roll of toilet paper and race to see who can wrap a member of the team up as a mummy the fastest. However, I couldn’t justify using all that toilet paper and then just tossing it away! And while I am all for re-using, I doubt anyone would want to use toilet paper for its intended purpose after a bunch of kids have been handling it. So I decided to use it as stuffing in a craft. The idea came about when I saw a post about a Halloween puppet craft that called for turning an old sock into a bat puppet. I had a light bulb moment and decided I could do something similar. I put out a request for parents to donate lonely old socks (clean, of course) as well as buttons, ribbons, and fabric scraps. On party day, after the mummy game, the kids took all that unrolled TP flying around the classroom and used it to stuff the socks until they were nice and full and fluffy.  Then using the donated notions, markers and fabric paint, students decorated the socks and turned them into whatever Halloween-y creature their little heart desired.  Parent volunteers helped complete the creations with glue guns, and TA DA! Boo Buddies were born.

The Boo Buddy Bat

Mr. Bat joined by more Boo Buddies: a mummy and a ghost.

I loved how they turned out out! I think this ended up being a fun little craft that lets kids use their imagination. And  Boo Buddies make sweet take home keepsakes!

I’ll try to showcase a few more crafts and ideas before Halloween flies by, I hope you’ll stop by for a spell.

A Slumber Party in Kirby’s Dreamland

I can’t believe I am typing this, but very soon…I shall be the mother of a 10 year-old.

beauiful-babyedit-400x295

Double digits.

oct11-tubbie-400x301

A decade.

mamababyinswing-480x600

Whoa.

The realization my baby was no longer a baby was recently driven home when it came time to plan the party. My Miss A wanted the hallmark “I’m growing up, MOM” birthday bash: aka the sleepover.

Which I was totally cool with…after all, I had my first b-day slumber party when I turned 8 (I can clearly remember the three friends who were at my house that night, their faces lit by the glow of the kitchen light off the living room where we lay giggling in our sleeping bags (mine was purple with a Lisa Frank bubblegum machine on it).

Considering this was the girl who spent her time in the womb listening to the Ocarina of Time soundtrack (and the first months of her life with Wind Waker) it was no surprise Miss A had decided on a video-game related theme for her party…her beloved pink puffball: Kirby. And thus the concept for the “Kirby’s Dreamland Slumber Party” was born.

Since it was a slumber party, most of the night would be spent eating too many snacks and talking too loud and staying up way too late. But, I admit, my theme-loving heart couldn’t help but put together a couple of Kirby-related things for the party.

Kirby-cake-400x225

candle-torture-434x600

Happy-cake-sisters-400x359

The decorations were simple, pink streamers and pink balloons and a giant pink poster Miss A’s buddies could write birthday greetings on.

Kirby-cups-400x300

And again, because my crafty soul couldn’t help herself,  the girls started the night with a painting project: Kirby Pop Art. I cut a standard poster board into quarters. The girls drew six panels on their board, painting each panel a different color. Then they used sponges cut in circles to paint Kirby’s body. To finish, some girls made Kirby’s features using black paint, some used markers. The results were pretty cute. and all unique.

Miss-A-Kirby-pop-art-300x400

The painting made a fun keepsake to take home, and for the other party favors, I got lucky and found pink “Chinese take-out boxes” on clearance.

Kirby-favor-boxes-400x256

Kirby-favor-boxes4-400x127

inside-favor-box-400x233

It was a fun, silly, and simple party. And I’m so glad my Miss A can enjoy the things she loves with people she loves.

Make-a-wish-10-years-400x340


This Birthday Party has Been Brought to You by the Letter G and the Number 2

This year Lil’ G turned 2.

At the time, she was into all things E-L-M-O, so it didn’t require an advanced education to decide what her birthday party theme should be.

This week, since I’m finally getting around to taking Lil’ G in for her 2 year check-up, I figure I should finally get around to sharing the fun of that day as well. It wasn’t THAT long ago, but long enough to allow her devotion to waver from the furry little red dude to a bi-lingual girl with a football haircut and a pet monkey with a shoe fetish.

(No plans for a fiesta de Dora are in the works yet – I have plenty of time before Lil G’s third birthday rolls around, and at the rate she’s going, she’ll have moved through princesses, fairies, and girls who like berries by then.)

But back to this year, and Lil’ G’s birthday celebration with her main man Elmo.

It was nice of him to come to the party.

I knew there would be toddlers running around dribbling cake and crackers and who knows what else, so we held the party in the back yard. Since we were outside, I kept the decorations minimal.

My big splurge was this ridiculously large helium Elmo balloon. It was windy the day of the party, and Elmo entertained us by bopping guests in the head. I was petrified the thing would blow away and take down a chopper. (Well, not really)

I’m pretty lucky, in that both my dad and my brother enjoy playing baker – and they each tried their hand at making a cake for Lil’ G.

My dad did his cake freehand, and he did a very nice job…even if Elmo looks like he’s had a bit too much cake himself recently.
My brother used one of those shaped  cake pans. I’ve never tried using one myself, but I’ve heard it’s harder than it looks – so I’m glad he did it; I think it looks great!
Looks aside, by the way it was gobbled up – it tasted pretty good too.
Especially that red frosting.
Aside from cake, a snack table was set up, where another furry dude made an appearance (this one blue).
Also present was Elmo’s pet and best pal, Dorothy.
Using votive bowls from Michaels for about $1 each, they made cute party favors.
Guests also got a goody bag filled with a silly straw, Sesame street coloring book, crayons and stickers…total cost of each Goody Bag ~ $5.  (I love the Dollar Store!) To make the Elmo faces, I cut circles out of red card stock and folded them in half (this way I was able to write a “Thank You for Celebrating With Me Today!” note inside). The nose was an oval cut from orange cardstock, the eyes small circles cut from plain white paper. Simple and quick to assemble, give the birthday kid a glue stick and s/he can help! (Or you could even turn it into a craft station during the party).
And this blue guy again.
Just circles cut from cardstock, but it took me awhile to get the hang of it, and it was funny to see the variations in my design. I would have used googly eyes, but I couldn’t find my stash of ’em.

A lot of the ideas you see here were inspired by a post at DESIGN DAZZLE. One idea that I take complete credit for, however – was the “fairy tent.” I pulled the girls’ princess tent outside, loaded it with wands and wings (of which we have MANY) and plunked this sign down in front of it:

Lil G’s older sister, Miss A, decorated this sign for her.
I think it turned out pretty cute!
It was a big hit with the birthday girl.
Even the boys had fun at the fairy school.

In the end, it was a lovely party. Lots of laughter and fun.

We enjoyed fresh air, sunshine, and fairly simple clean up. I love outdoor parties!

And most importantly, one happy birthday girl.

Need some party ideas? I am submitting this post to BirdCrafts DIY Celebration Linky Party. Go check it out and get inspired!